Dorema Awning Instructions: From Setup to Takedown
Think setting up Dorema Awnings is a wrestling match with poles and fabric? It’s easier than pitching a tent with toddlers around.
Short answer: follow a few clear steps and you’re golden.
Keep reading to learn the tools, tricks, and no-swearing-required setup for stress-free shade and comfort.
Getting Started: Before You Erect Your Dorema Awning
Pre-Erection Checks and Preparation
Choosing the Right Pitch: Finding a Level and Suitable Spot
Before anything else, pick your pitch wisely. The ground should be level, clear of debris, and large enough for full awning extension.
Also, think about where the sun rises and which way the wind usually blows. That way, you’ll get the most comfort and stability from your awning.
It’s all about planning ahead to avoid surprises.

What's in the Bag? Unpacking and Checking Your Awning Components
Lay everything out on a clean surface once you open the bag.
It helps to group similar items together—poles in one area, guy ropes and pegs in another.
Use the checklist in your manual to make sure nothing’s missing.
This step saves time and frustration later.
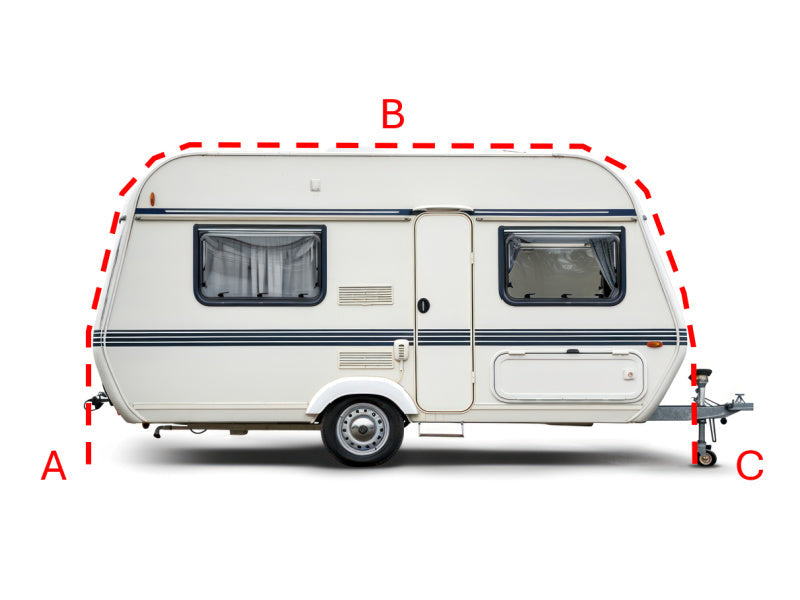
Understanding Your Dorema Awning's Frame Diagram
Your manual will have a frame diagram. Study it before you begin.
Familiarise yourself with the pole layout, corner joints, and any special fittings.
This overview makes the rest of the setup much smoother.
Essential Tools and Accessories for a Smooth Setup
The Right Pegs for the Job: Hardstanding vs. Soft Ground
Soft grass? Standard pegs are fine.
But if you’re on hardstanding or rocky terrain, go for heavy-duty or screw-in pegs.
They provide better grip and won’t pop out in rough weather.
Using the Dorema Quick Lock Pads for Easy Frame Attachment
If your model includes Quick Lock Pads, use them.
They let you fix poles to your caravan quickly and securely—no need to drill holes.
Great for beginners and seasoned campers alike.
The Importance of the Safe Lock System and Storm Straps
Don’t overlook storm straps and the Safe Lock System.
They add crucial stability when wind picks up.
It’s a simple upgrade that can make a big difference in bad weather.
Preparing Your Caravan and Awning Rail
Cleaning and Lubricating the Awning Rail
Before feeding in the canvas, clean the awning rail thoroughly.
Remove dust, dirt, and any old residue.
A light silicone spray makes the canvas glide smoothly and prevents tears.
Attaching Ladder Straps and Other Fittings
Ladder straps help you fine-tune the canvas tension once it’s up.
Attach them to the base points of the awning before pegging.
Also, install any brackets or supports needed for your particular setup.

A Step-by-Step Guide to Erecting Your Dorema Awning
Assembling a Poled Dorema Awning
Threading the Awning Canvas into the Rail
Feed the canvas gently into the awning rail.
Make sure it doesn’t snag or twist.
This is much easier with two people—one to guide and one to pull.
Building the Frame: Starting with the Centre Poles
Start with the centre poles and corner joints.
Then work outward.
Keep everything square and check alignment as you go.
Attaching the Canvas and Tensioning the Poles Correctly
Once the canvas is draped over the frame, secure it with clips or straps.
Adjust pole tension gradually.
Too loose and it’ll sag—too tight and things may snap.
Pegging Out Your Awning for Maximum Stability
Peg at an angle away from the awning for best hold.
Push them deep into the ground, especially in windy spots.
Add guy ropes and tension them until the fabric is taut.
Setting Up a Dorema Inflatable Awning (Air Awning)
Attaching the Awning and Pegging Out the Corners
Slide the air awning into the rail like a poled version.
Peg down all four corners lightly to keep its shape.
You’ll firm them up after inflation.
Inflating the Air Tubes to the Correct Pressure
Use the supplied pump to inflate each air beam.
Stick to the recommended PSI—don’t overdo it.
Too much pressure can damage seams.
Fitting Roof Bars and Other Supports
Once inflated, fit in any roof supports or tension bars.
These help maintain the structure and shape of the awning.
Guiding and Securing Your Inflatable Awning
Double-check the alignment of everything.
Then tighten all guy ropes and re-peg for security.
Add storm straps if the weather looks unpredictable.

Common Problems and Troubleshooting
Dealing with a Sagging Awning
A sagging roof means something’s too loose.
Check pole tension or add more pegs.
Make sure the pitch is level—it matters more than you think.
How to Handle a Leaking Air Tube
If one air beam keeps deflating, check for punctures.
Most Dorema kits include patches for this very reason.
Deflate, repair, then reinflate carefully.
What to Do in Strong Winds and Bad Weather
Avoid setting up if the forecast looks grim.
But if you're already pitched, use extra pegs and storm straps.
Lowering the height slightly can help reduce wind resistance.
Other content you might like:
Share this
Popular posts
Leave a comment