How To Build a Shepherd Hut: The Ultimate DIY Project
Ever dreamed of escaping to the garden in style? Shepherd’s huts are your cosy, wheeled answer. Short answer? Build a steel base, frame it up, roof it, and make it yours. This guide shows you how—step by step—with charm, tools, and zero sheep required. Ready to roll?
Planning Your Shepherd's Hut Build
Designing Your Shepherd's Hut: Key Considerations
Choosing the Right Size and Layout for Your Needs
Before you begin building, think about what your shepherd’s hut is for. Will it be a garden hideaway, an office, or a glamping pod?
This affects the size and layout you’ll need. A studio might need more natural light, while a guest hut may prioritise sleeping space.
Make your layout suit your lifestyle, not just the trend.
Creating Detailed Plans and Drawings
Good plans are essential. Sketch your ideas or use design software to map out key features like door positions, windows, and roof curve.
If you're unsure, consider hiring a professional for detailed drawings. Accurate plans help prevent costly mistakes later.
Measure twice—build once.
Sourcing Materials: New vs. Reclaimed
You’ll need timber, cladding, roof sheets, and insulation. Decide if you’ll use all-new materials or incorporate reclaimed ones.
Reclaimed wood adds character and often reduces costs.
Just make sure all materials are structurally sound and weather-resistant.
Do-It-Yourself vs. Buying a Shepherd's Hut Kit
Building from scratch offers full creative control, but takes more time and skill.
Pre-cut kits can simplify the process while still allowing customisation.
Choose based on your tools, experience, and how involved you want to be.
Building the Foundation: The Chassis and Floor
Choosing a Chassis: Steel vs. Wood
The chassis is the backbone of your hut. Most modern builders choose steel for strength and weather resistance.
Wooden bases have a classic feel, but require regular upkeep.
Think about long-term durability, especially if your hut will be mobile.
Assembling the Floor Frame and Insulation
Once your chassis is ready, build the floor frame. Secure it well.
Then add insulation—essential for comfort year-round.
Choose materials like PIR boards or sheep’s wool depending on your budget and eco goals.
Laying the Floorboards
With the frame and insulation in place, you can lay your floorboards.
Hardwood looks great and lasts, but softwood can work if treated properly.
Make sure everything is level and securely fixed.
The Step-by-Step Construction Process
Framing and Cladding the Walls
Building and Erecting the Wall Frames
Construct wall frames using solid timber and secure joints. Mortise and tenon joints are a popular traditional method.
Once built, stand them upright and brace them in place.
They form the skeleton of your hut.
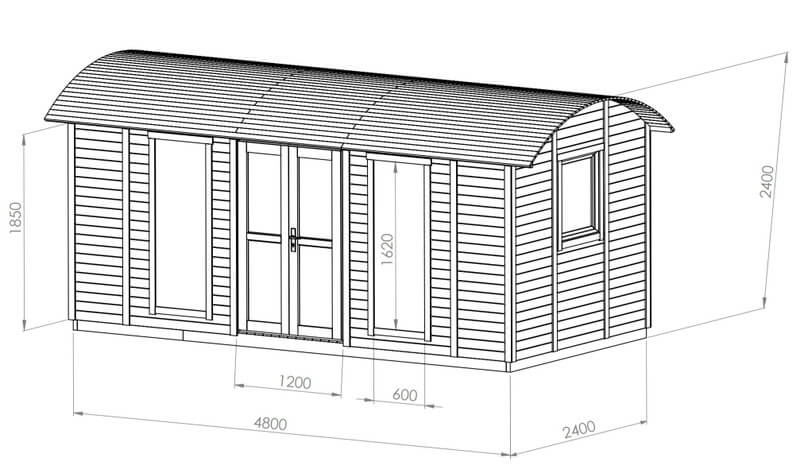
Adding Windows and Doors
Plan your window positions carefully. South-facing windows offer warmth and light.
Install window frames before cladding the walls.
For doors, choose something sturdy and weather-resistant that complements the hut’s look.

Applying Exterior Cladding: Wood vs. Corrugated Metal
Timber cladding provides a rustic finish and natural insulation.
Corrugated metal is low-maintenance and modern-looking.
Whichever you pick, install it tightly and use quality fixings to withstand the elements.
Insulating the Walls and Adding a Vapour Barrier
Insulation makes your hut usable year-round. Choose breathable materials if possible.
A vapour barrier prevents damp build-up inside walls.
Install insulation before interior cladding goes up.
Building and Installing the Roof
Constructing the Curved Roof Trusses
The signature curve of a shepherd’s hut requires shaped roof trusses.
You can cut these yourself or buy pre-formed ones.
Ensure they are all uniform and securely mounted to the wall frames.
Sheathing and Waterproofing the Roof
Once trusses are in place, add sheathing boards over the top.
Then apply a breathable membrane to keep water out while allowing airflow.
Secure everything down before the next step.
Fitting the Corrugated Iron Roof
Lay sheets of corrugated iron carefully, overlapping each row.
Screw them down with washers to avoid leaks.
Check all edges are sealed to protect your build from the weather.
Finishing the Interior and Adding Utilities
Installing Interior Cladding and Flooring
Inside, line the walls with timber cladding for a warm, cabin-like feel.
This hides insulation and creates a tidy interior.
You can stain or paint it for your desired aesthetic.
Wiring for Electrics and Plumbing for Water
If your hut needs power or plumbing, this is the time to run cables and pipes.
Hire a qualified tradesperson for safety and compliance.
Plan the routes carefully to avoid interfering with later work.
Fitting a Wood-Burning Stove
A stove adds both heat and charm. Install a flue and use heat-proof materials around it.
Always follow safety regulations, especially in such a compact space.
Ventilation is essential.
Furnishing and Decorating Your Shepherd's Hut
Once the structure is sound, it’s time to furnish.
Keep it simple—multifunctional furniture saves space.
Add textiles, lighting, and personal touches to make it feel like home.

Budgeting and Final Touches
How to Build a Shepherd's Hut on a Budget
Tips for Saving Money on Materials
Buy second-hand materials where possible. Salvage yards and online marketplaces are great sources.
Use leftover materials from other projects.
Avoid overbuying—plan quantities carefully.
Cost-Effective Alternatives to Traditional Features
Skip built-in kitchens and use freestanding or camp-style setups.
Solar lights can replace hardwired fixtures.
A recycled door or window frame adds character and cuts costs.
Where to Find Affordable Fittings and Furnishings
Check charity shops, car boot sales, and local selling groups.
Many hidden gems are waiting to be upcycled.
Focus your budget on essentials and get creative with the rest.
Other content you might like:
Share this
Popular posts
Leave a comment